

Browser fingerprinting is the act of collecting browser and device information from a site visitor's web browser to identify it.
Similar to cookies, fingerprinting can be triggered when a user performs a task on your website such as filling out a form or adding an item to their cart. However, whereas site visitors can set their browsers to filter or completely block HTTP cookies, evading fingerprint identification is not as straightforward. Even if cookies are disabled, fingerprinting can still identify browsers and devices accurately using a wide range of data points.
In addition to enhancing the user experience, browser fingerprints can be used to protect site owners from malicious bot attacks, identify DDoS attack patterns, enforce paywalls, and prevent fraudulent transactions.
Fingerprint is a device intelligence platform that lets you integrate comprehensive device fingerprinting and visitor insights into your websites and web applications. Developers can access its features through a collection of APIs, webhooks, integrations, SDKs, and libraries.
This guide shows you how to use Fingerprint’s client-side JavaScript library and its server-side Java SDK to integrate fingerprinting into a simple Java-based web application.
Scenario
Websites often run competitions to drum up engagement, increase site visitors, and generate new leads. For this tutorial, suppose you want to run a competition that each site visitor can enter only once.
Trying to validate each unique entry using an email address isn't going to cut it. Visitors attempting to game your system can simply register a dummy email address and use a pseudonym. In some cases, they may even try to automate the process through a bot. So you need a more sophisticated approach. After all, you want to keep things fair and ensure your database isn't flooded with entries.
This is where browser fingerprinting comes in. The following tutorial will show you how to build a Java web application with a competition form that will be validated using a browser fingerprint. You'll use one of Fingerprint's client-side libraries to generate the fingerprint and its Java server-side SDK to ensure it's reliable.
Project Prerequisites
This tutorial uses the following tools and components:
- JDK (preferably the latest LTS release)
- PostgresSQL
- Spring Boot
- Fingerprint Pro account, which you can access with a fourteen-day free trial (no credit card required)
- Maven Wrapper
- Java SDK for Fingerprint Pro Server API
If you want to skip ahead, clone, and/or download the project's source code, you can find it in this GitHub repository.
Otherwise, read on for a step-by-step walkthrough.
Setting Up the Project
First, you need to initialize your project using Spring Boot.
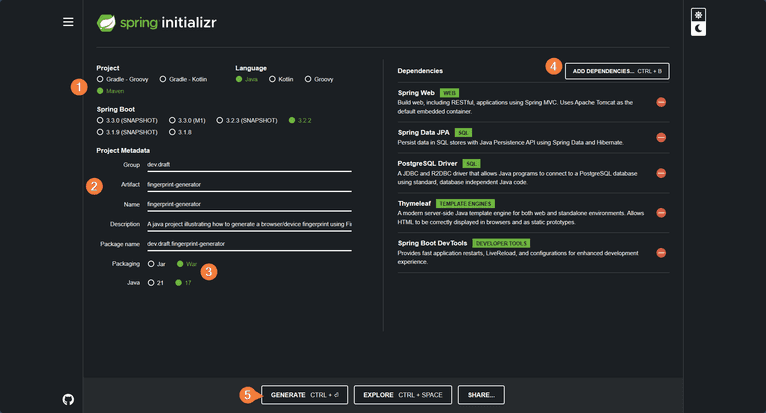
Navigate to the Spring Initializer and select Maven as the project type and Java as the language (with 17 as its version). It's best to select the latest stable version of Spring Boot (3.2.2 at the time of writing).
Set your project metadata accordingly, add Spring Web, Spring Data JPA, Thymeleaf, Spring Boot DevTools, and the PostgreSQL Driver as dependencies, and then generate your Spring Boot project:
Creating the Client
Next, you'll create a simple frontend for your competition form containing fields for the visitor's name, surname, and email address.
Your form could also contain other fields, such as a checkbox asking for permission to send digital marketing material (newsletters) or text fields for phone numbers and other information. But for this tutorial, you can keep things simple and go without these.
Open your Spring Boot application and navigate to the templates folder under resources (src/main/resources/templates). Create a new file named competitionform.html and add the following code to it:
<!DOCTYPE html>
<html xmlns:th="https://www.thymeleaf.org">
  <head>
    <title>Competition Form</title>
    <link
      rel="stylesheet"
      href="https://use.fontawesome.com/releases/v5.4.1/css/all.css"
      integrity="sha384-5sAR7xN1Nv6T6+dT2mhtzEpVJvfS3NScPQTrOxhwjIuvcA67KV2R5Jz6kr4abQsz"
      crossorigin="anonymous"
    />
    <link
      href="https://fonts.googleapis.com/css?family=Roboto:300,400,500,700"
      rel="stylesheet"
    />
    <style>
      html,
      body {
        min-height: 100%;
        padding: 0;
        margin: 0;
        font-family: Roboto, Arial, sans-serif;
        font-size: 14px;
        color: #666;
      }

      h1 {
        margin: 0 0 20px;
        font-weight: 400;
        color: lightgreen;
      }

      p {
        margin: 0 0 5px;
      }

      .main-block {
        display: flex;
        flex-direction: column;
        justify-content: center;
        align-items: center;
        min-height: 100vh;
        background: lightgreen;
      }

      form {
        padding: 25px;
        margin: 25px;
        box-shadow: 0 2px 5px #f5f5f5;
        background: #f5f5f5;
      }

      .fas {
        margin: 25px 10px 0;
        font-size: 72px;
        color: #fff;
      }

      .fa-envelope {
        transform: rotate(-20deg);
      }

      .fa-at,
      .fa-mail-bulk {
        transform: rotate(10deg);
      }

      input,
      textarea {
        width: calc(100% - 18px);
        padding: 8px;
        margin-bottom: 20px;
        border: 1px solid lightgreen;
        outline: none;
      }

      input::placeholder {
        color: #666;
      }

      button {
        width: 100%;
        padding: 10px;
        border: none;
        background: lightgreen;
        font-size: 16px;
        font-weight: 400;
        color: #fff;
      }

      button:hover {
        background: #2371a0;
      }

      @media (min-width: 568px) {
        .main-block {
          flex-direction: row;
        }
        .left-part,
        form {
          width: 30%;
        }
        .fa-envelope {
          margin-top: 0;
          margin-left: 20%;
        }
        .fa-at {
          margin-top: -10%;
          margin-left: 65%;
        }
        .fa-mail-bulk {
          margin-top: 2%;
          margin-left: 28%;
        }
      }
    </style>
  </head>
  <body>
    <div class="main-block">
      <div class="left-part">
        <i class="fas fa-envelope"></i>
        <i class="fas fa-at"></i>
        <i class="fas fa-mail-bulk"></i>
      </div>
      <form
        action="#"
        th:action="@{/competitionform}"
        th:object="${competitionform}"
        method="post"
      >
        <h1>Competition Entry Form</h1>
        <p>Please fill in your details to enter the competition:</p>
        <div class="info">
          <!-- Used to pass the Fingerprint Generated Vistor ID -->
          <input
            name="visitorId"
            id="visitorId"
            value=""
            hidden
            th:field="*{visitorId}"
          />
          <!-- Will be used to pass the Request ID for validations-->
          <input
            name="requestId"
            id="requestId"
            value=""
            hidden
            th:field="*{requestId}"
          />
          <!-- -->
          <input
            type="text"
            name="name"
            placeholder="First Name"
            th:field="*{firstName}"
          />
          <input
            type="text"
            name="surname"
            placeholder="Last Name"
            th:field="*{lastName}"
          />
          <input
            type="text"
            name="email"
            placeholder="Email Address"
            th:field="*{emailAddress}"
          />
          <button type="submit">Submit</button>
        </div>
      </form>
    </div>
  </body>
</html>
In addition to the aforementioned fields, the web page contains an embedded stylesheet for visual aesthetics. It uses Thymeleaf for templating, which can be identified by the th tags. Thymeleaf will ultimately enable you to pass values between the client and server.
Next, you'll need to create a controller to handle events. Create a new Java file named FingerprintController.java with the following code in it:
package dev.draft.fingerprintgenerator;

import org.springframework.beans.factory.annotation.Autowired;
import org.springframework.stereotype.Controller;
import org.springframework.ui.Model;
import org.springframework.web.bind.annotation.*;

@Controller
public class FingerprintController {
  @Autowired
  EntryService entryService;

  @GetMapping("/competitionform")
  public String competitionForm(Model model) {
    model.addAttribute("competitionform", new Entry());
    return "competitionform";
  }

  @PostMapping("/competitionform")
  public String competitionSubmit(@ModelAttribute Entry entry, Model model) {
    model.addAttribute("competitionform", entry);
  }
}
For now, the controller facilitates the POST and GET operations. You'll notice that these methods both reference the Entry class. You'll build this object, which represents both your persistence layer and the frontend, a little later.
For now, you'll need a page that is displayed after the user submits a form. Navigate to the resources/templates folder and create a new file named result.html. Add the following content to it:
<!DOCTYPE html>
<html xmlns:th="https://www.thymeleaf.org">
  <head>
    <title th:text="${title}" />
    <meta http-equiv="Content-Type" content="text/html; charset=UTF-8" />
    <link
      rel="stylesheet"
      href="https://use.fontawesome.com/releases/v5.4.1/css/all.css"
      integrity="sha384-5sAR7xN1Nv6T6+dT2mhtzEpVJvfS3NScPQTrOxhwjIuvcA67KV2R5Jz6kr4abQsz"
      crossorigin="anonymous"
    />
    <link
      href="https://fonts.googleapis.com/css?family=Roboto:300,400,500,700"
      rel="stylesheet"
    />
    <style>
      html,
      body {
        min-height: 100%;
        padding: 0;
        margin: 0;
        font-family: Roboto, Arial, sans-serif;
        font-size: 14px;
        color: #666;
      }

      h1 {
        margin: 0 0 20px;
        font-weight: 800;
        font-size: 80px;
        color: lightgreen;
      }

      p {
        margin: 0 0 5px;
        font-size: 20px;
      }

      .main-block {
        display: flex;
        flex-direction: column;
        justify-content: center;
        align-items: center;
        min-height: 100vh;
        background: lightgreen;
      }

      .left-part {
        padding: 25px;
        margin: 25px;
        background: #f5f5f5;
      }

      .fas {
        margin: 25px 10px 0;
        font-size: 72px;
        color: #fff;
      }

      .fa-comment {
        transform: rotate(-20deg);
      }

      .fa-star,
      .fa-eye {
        transform: rotate(10deg);
      }

      @media (min-width: 568px) {
        .main-block {
          flex-direction: row;
        }
      }

      .left-part,
      .right-part {
        width: 50%;
      }

      .fa-comment {
        margin-top: 0;
        margin-left: 20%;
      }

      .fa-star {
        margin-top: -10%;
        margin-left: 65%;
      }

      .fa-eye {
        margin-top: 2%;
        margin-left: 28%;
      }

      .fa-hourglass {
        margin-top: 8%;
        margin-left: 50%;
      }
    </style>
  </head>
  <body>
    <div class="main-block">
      <div class="left-part">
        <h1 th:text="${heading}" />
        <p th:text="${body}" />
      </div>
      <div class="right-part">
        <i class="fas fa-eye"></i>
        <i class="fas fa-star"></i>
        <i class="fas fa-comment"></i>
        <i class="fas fa-hourglass"></i>
      </div>
    </div>
  </body>
</html>
It uses Thymeleaf's standard dialectics to help generate its content dynamically.
Note: You can also create a model/template class for result.html for a potentially cleaner implementation.
You're done with your frontend (for now) and can set up your persistence layer next.
Setting Up Your Database
Create a new PostgreSQL database called competitiondb:
CREATE DATABASE competitiondb;Connect to the database and create a new table named entries with columns for visitorId, first name, last name, and email address:
CREATE TABLE entries(
  visitor_id TEXT,
  first_name TEXT,
  last_name TEXT,
  email_address TEXT UNIQUE
  );
Note that you don't have to use the console to create the entities above. You can use pgAdmin if you're more comfortable with a graphical user interface.
Once that's done, find the application.properties file Spring Boot created in the resources folder and add the following code to it:
spring.datasource.url=jdbc:postgresql://localhost:5432/competitiondb
spring.datasource.username=your_database_username
spring.datasource.password=your_database_password
spring.datasource.driver-class-name=org.postgresql.Driver
Remember to replace the datasource URL (if necessary), username, and password values with your own details.
Next, create a new source file named Entry.java. Since it must model the entry table in your database, its initial code should look like this:
package dev.draft.fingerprintgenerator;

import jakarta.persistence.*;

@Entity
@Table(name = "entries")
public class Entry {
  @Id
  @Column(name = "visitor_id")
  private String visitorId;
  @Column(name = "first_name")
  private String firstName;
  @Column(name = "last_name")
  private String lastName;
  @Column(name = "email_address")
  private String emailAddress;

  @Column(insertable = false, updatable = false)
  @Transient
  private String requestId;

  public Entry() {

  }

  public String getFirstName() {
    return firstName;
  }

  public void setFirstName(String firstname) {
    this.firstName = firstname;
  }

  public String getLastName() {
    return lastName;
  }

  public void setLastName(String lastName) {
    this.lastName = lastName;
  }

  public String getEmailAddress() {
    return emailAddress;
  }

  public void setEmailAddress(String emailAddress) {
    this.emailAddress = emailAddress;
  }

  public String getVisitorId() {
    return visitorId;
  }

  public void setVisitorId(String visitorId) {
    this.visitorId = visitorId;
  }

  @Transient
  public String getRequestId() {
    return requestId;
  }

  @Transient
  public void setRequestId(String requestId) {
    this.requestId = requestId;
  }
}
You'll notice that the requestId variable, along with its getters and setter, is transient. It's also non-insertable and non-updateable. This is because requestId doesn't have a dedicated column in your table. Instead, you'll use requestId to help with server-side validations.
Next, you need to create a repository for your entity called EntryRepository.java. It will facilitate operations between your server and your persistence layer. Its code is fairly simple:
package dev.draft.fingerprintgenerator;

import org.springframework.data.jpa.repository.JpaRepository;

public interface EntryRepository extends JpaRepository<Entry, String> { }
This code uses the JpaRepository's API to perform database operations. However, to do this, it must be given the entity (Entry) and its ID type (String).
Next, you must add a service that will implement the EntryRepository's methods. Create a new source file named EntryService.java, and add the following code to it:
package dev.draft.fingerprintgenerator;

import org.postgresql.util.PSQLException;
import org.springframework.beans.factory.annotation.Autowired;
import org.springframework.stereotype.Service;
import java.util.Optional;

@Service
public class EntryService {
  @Autowired
  private EntryRepository entryRepository;

  // Create a new competition entry
  public Entry createEntry(Entry entry) throws PSQLException {
    return entryRepository.save(entry);
  }

  // Checks if the entry exists in the table using the visitor id
  public boolean entryExistByID(Entry entry) {
    return entryRepository.existsById(entry.getVisitorId());
  }
}
EntryService implements two methods: one that checks if an entry exists (according to its visitorId) and one that creates a new entry.
Adding Fingerprint
Fingerprint is a service that allows you to extract important information about devices online. Its key feature enables you to generate a unique inimitable ID, or device fingerprint, that can be used to detect your website's return visitors. Fingerprint's identification service is 99.5 percent accurate, even when employed against evasion tactics such as incognito mode, anti-fingerprinting settings, or VPN use.
You can furthermore use Fingerprint's Smart Signals to get further insights into your visitor's device, such as determining if the visitor is using a VPN, bot, or virtual machine.
Since all you need for this tutorial is the device/browser fingerprint, you'll stick to the identification feature.
Start by navigating to the Fingerprint Pro dashboard. Select App Settings from the left panel, click API Keys from the main panel, and copy the active public key:
Navigate to competitionform.html and add the following code between the <head></head> tags, replacing the <YOUR-API-KEY> portion with the public key you copied earlier:
  <script src="https://fpjscdn.net/v3/<YOUR-API-KEY>/iife.min.js"></script>
  <script>
    const fpPromise = import("https://fpjscdn.net/v3/YOUR-API-KEY").then(
      (FingerprintJS) => FingerprintJS.load()
    );

    fpPromise
      .then((fp) => fp.get())
      .then((result) => {
        console.log(result.requestId, result.visitorId); //remove for production
        document.getElementById("requestId").value = result.requestId;
        document.getElementById("visitorId").value = result.visitorId;
      });
  </script>
The code above creates an implementation for the Fingerprint API. It then calls it asynchronously to extract the visitor ID. You'll notice that it includes some logging code (console.log(document.getElementById('visitorId').value)) to aid in troubleshooting. This can be removed when you're certain that visitorId is passed to the corresponding field.
Now that you have all the necessary fields for your entity (entry), you can commit it to your database. Alter your FingerprintController by adding the following code to the competitionSubmit method:
try {
  //Uses the visitorId to check if the entry exists in the table
  if (entryService.findEntryById(entry).isEmpty()) {
    //Attempts to create a new entry
    entryService.createEntry(entry);
    model.addAttribute("title", "Congratulations!");
    model.addAttribute("heading", "Awesome Sauce");
    model.addAttribute("body", "Well done! You have been succesfully entered into our competition!");
    return "/result";
  } else {
    //If visitorId exists, display fail screen
    model.addAttribute("title", "Ooops Sorry!");
    model.addAttribute("heading", "Oh No!");
    model.addAttribute("body", "It looks like you've already been entered into our competition.");
    return "/result";
  }

} catch (PSQLException psqlException) {
  //Is triggered if email already exists in the table
  model.addAttribute("title", "Ooops Sorry!");
  model.addAttribute("heading", "Oh No!");
  model.addAttribute("body", "It looks like you've already been entered into our competition using this email address.");
  return "/result";
} catch (Exception exception) {
  //Handles all other exceptions
  model.addAttribute("title", "Ooops Sorry!");
  model.addAttribute("heading", "Oh No!");
  model.addAttribute("body", "Looks like we've encountered an error. We're looking at it now");
  exception.printStackTrace();
  return "/result";
}
First, it checks to see if visitorId exists in the table by calling the findEntryById(entry) method. If it finds that visitorId doesn't exist, it attempts to create and save a new entry. If the code finds that the email address submitted is already present in the database table, it throws a PSQLException. Regardless of which logical path the code follows, the user will always be routed to the result page, which will then inform them of the status of their entry submission.
Implementing Additional Server Validations
Before committing the competition entry into your database, it’s a good idea to bolster the visitor identification process. Since the visitor ID was generated on the client side, it can be intercepted and tampered with.
You can use Fingerprint’s Server API’s endpoints to ensure the verification of each entry. It enables you to detect visitor ID tampering and get additional information about the identification request. For Java applications, you can implement the Fingerprint Server API using the Java SDK.
Navigate to your project's POM.XML and add the following repository:
<repositories>
  <repository>
    <id>jitpack.io</id>
    <url>https://jitpack.io</url>
  </repository>
</repositories>
While you still have your POM.XML opened, add the following between the <dependencies></dependencies> tags:
<dependency>
<groupId>com.github.fingerprintjs</groupId>
<artifactId>fingerprint-pro-server-api-java-sdk</artifactId>
<version>v3.0.0</version>
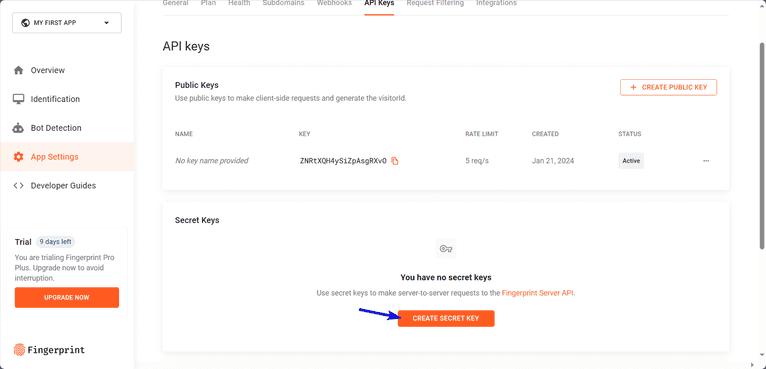
</dependency>You'll need a secret API key to use Fingerprint Pro Server's features. Return to the API key app settings in your Fingerprint dashboard, and click the CREATE SECRET KEY button.
In the small form screen, enter a name for your secret key, such as My Java Server Key. Next, enter a description (or skip this field), select the Secret option under Type, then click CREATE API KEY.
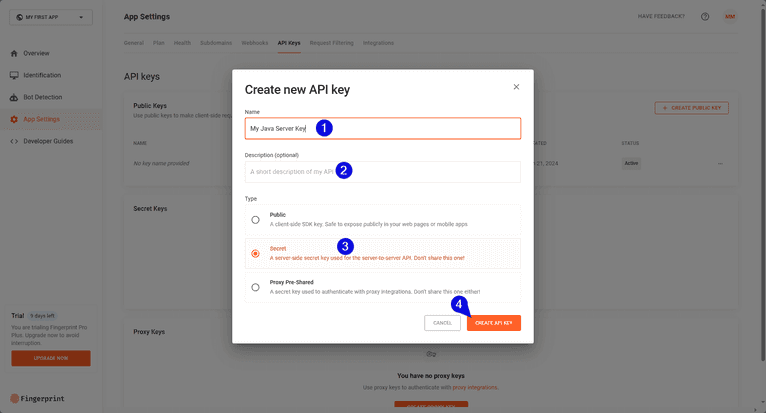
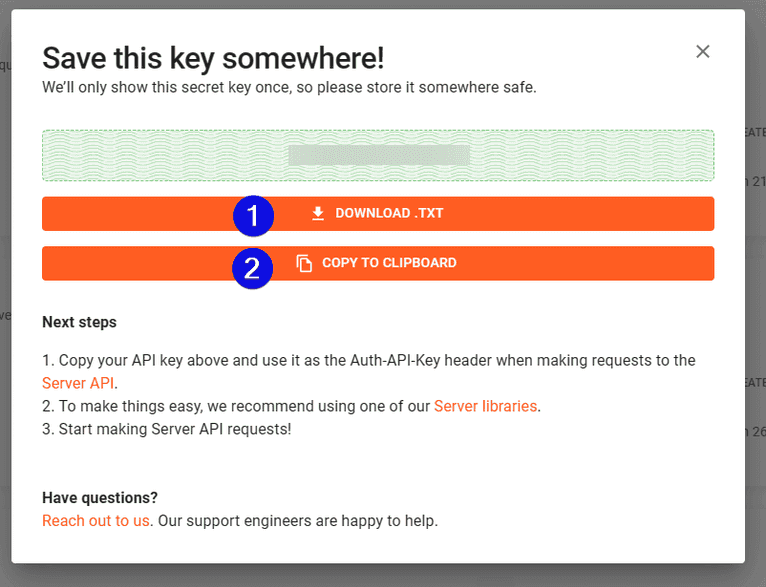
If you've successfully completed and submitted the API Key form, you'll be shown a screen that lets you download or copy your secret key to your clipboard. Download and copy it to be safe.
Now, you need to alter the FingerprintController.java class:
package dev.draft.fingerprintgenerator;

import com.fingerprint.model.Confidence;
import com.fingerprint.model.ProductsResponseIdentificationData;
import com.fingerprint.sdk.Region;
import org.postgresql.util.PSQLException;
import org.springframework.beans.factory.annotation.Autowired;
import org.springframework.stereotype.Controller;
import org.springframework.ui.Model;
import org.springframework.web.bind.annotation.*;

//Beginning of Fingerpint Imports
import com.fingerprint.api.FingerprintApi;
import com.fingerprint.model.EventResponse;
import com.fingerprint.sdk.ApiClient;
import com.fingerprint.sdk.ApiException;
import com.fingerprint.sdk.Configuration;
//End of Fingerprint Imports

import org.springframework.dao.DataIntegrityViolationException;
import javax.ws.rs.BadRequestException;
import java.util.Objects;


@Controller
public class FingerprintController {
  //Replace value with your own Secret API Key
  private static final String FPJS_API_SECRET = "Secret API Key";

  @Autowired
  EntryService entryService;


  @GetMapping("/competitionform")
  public String competitionForm(Model model) {
    model.addAttribute("competitionform", new Entry());
    return "competitionform";
  }

  @PostMapping("/competitionform")
  public String competitionSubmit(@ModelAttribute Entry entry, Model model) {
    model.addAttribute("competitionform", entry);
    try {
      //Validates the legitimacy of the visitorId
      this.validateFingerprint(entry);
      //Checks to see if an entry with the same visitorId exists in the table
      if (!entryService.entryExistByID(entry)) {
        //Attempts to create a new entry
        entryService.createEntry(entry);
        model.addAttribute("title", "Congratulations!");
        model.addAttribute("heading", "Awesome Sauce!");
        model.addAttribute("body", "Well done! You have been successfully entered into our competition!");
      } else {
        //If visitorId exists, display fail screen
        model.addAttribute("title", "Ooops, Sorry!");
        model.addAttribute("heading", "Oh No!");
        model.addAttribute("body", "It looks like you've already been entered into our competition.");


      }
      return "/result";

    } catch (DataIntegrityViolationException | PSQLException exception) {
      //Is triggered if email already exists in the table
      model.addAttribute("title", "Error");
      model.addAttribute("heading", "Oh No!");
      model.addAttribute("body", "It looks like you've already been entered into our competition using this email address.");
      exception.printStackTrace();
      return "/result";
    } catch (BadRequestException badRequestException) {
      //Is triggered if user tries to temper with the VisitorId
      model.addAttribute("title", "Error");
      model.addAttribute("heading", "Oh No!");
      model.addAttribute("body", "Looks like you've tried to forge the visitor id. Please leave the website.");
      badRequestException.printStackTrace();
      return "/result";

    } catch (Exception exception) {
      //Handles all other exceptions
      model.addAttribute("title", "Error");
      model.addAttribute("heading", "Oh No!");
      model.addAttribute("body", "Looks like we've encountered an issue. We'll take a look at it right away!");
      exception.printStackTrace();
      return "/result";
    }

  }

  //Performs the bulk of the serverside validations
  private void validateFingerprint(Entry entry) throws BadRequestException {
    //Replace the region value with your API's own region
    ApiClient client = Configuration.getDefaultApiClient(FPJS_API_SECRET, Region.ASIA);
    FingerprintApi api = new FingerprintApi(client);
    try {
      // Use the requestId from the client to retrieve an event
      EventResponse response = api.getEvent(entry.getRequestId());
      ProductsResponseIdentificationData productsResponseIdentificationData = Objects.requireNonNull(response.getProducts().getIdentification()).getData();


      //Compares the given visitorId to the visitorId located on the server
      if (!productsResponseIdentificationData.getVisitorId().contentEquals(entry.getVisitorId())) {
        throw new BadRequestException("forged_visitor_id");
      }

      //Compares the identification timestamp to the request timestamp
      long currentTimeMillis = System.currentTimeMillis();
      long identificationTime = currentTimeMillis / 1000 L;
      long diff = currentTimeMillis - identificationTime;
      if (diff > productsResponseIdentificationData.getTimestamp()) {
        throw new BadRequestException("forged_visitor_id_timestamp");
      }

      //Checks the confidence score.
      Confidence confidence = productsResponseIdentificationData.getConfidence();
      /*You can set the minimum confidence score to any value you feel comfortable with.
       * Values must be between 0 and 1 (floating point).
       */

      if (confidence.getScore() < 0.60) {
        throw new BadRequestException("Not Confident");
      }
    } catch (ApiException apiException) {
      apiException.printStackTrace();
    }
  }

}
The code above adds all the necessary initializations, including imports and Secret API Key. Remember to replace the value of the secret API constant with your own API key.
The code also adds a new method called fingerprintValidation. This method accepts an Entry object so it can perform validations on the requestId and vistiorId variables. The method uses these variables to first determine if an identification request was made recently. It then checks the confidence score, which indicates the system's certainty in the validity of the visitor ID.
Running the Project
As with most Spring Boot Maven projects, you can launch the application using the ./mvnw spring-boot:run command from a terminal screen such as cmd or powershell. This command instructs Maven Wrapper to build your application and deploy it to an embedded Tomcat server. Since the server uses port 8080, you must ensure that it's free. Alternatively, you can specify a different port number in your application's properties file.
Once the build process is complete, use your web browser to navigate to the http://localhost:[port-number]/competitionform address.
Note: The [port-number] placeholder should be replaced with your own server's port number (eg http://localhost:8080/competitionform).
When a new visitor successfully inputs their details into the competition form and clicks on the Submit button, they’re shown a success message:
If they try to re-enter the competition (with a new or old email) they will be confronted with an error message:
Here is the completed project’s source code.
Conclusion
Using Fingerprint with your current site monitoring and vector tracking tools gives you a more complete picture of site visitor behavior. Fingerprint helps you gain the knowledge to protect yourself and improve the overall experience for site visitors. You can sign up for a free trial to try it out.
FAQ
Browser fingerprinting is a method to uniquely identify website users by analyzing details about their web browsers to generate an identifier. This information can include details like browser version, screen resolution, and installed fonts to uniquely identify a user's device.
Adding browser fingerprinting to your app can enhance security by detecting and preventing fraudulent activities. It can also be used to improve user experience by enabling personalized settings without requiring logins.
Browser fingerprinting provides a much more persistent form of visitor identification than cookies, which users can easily clear or block. It allows for effective identification and fraud detection capabilities even with stricter privacy settings and cookie restrictions.


